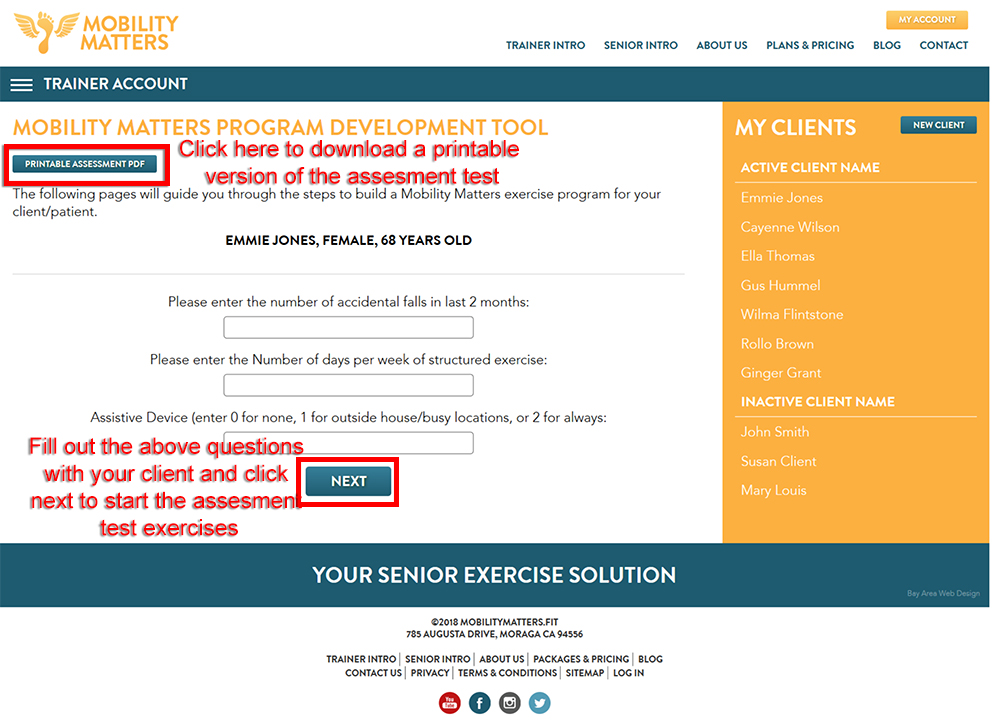
The Assessment Process
September 17, 2018
Correct administration of the physical assessments is important because our program design algorithm constructs the client’s exercise program based on these inputs. Following several important interview questions, each physical assessment includes both a measured score (distance, time, repetitions) and several movement observations to be determined with YES or NO responses. We recommend practicing these assessments on friends, family, colleagues – anyone and everyone who is willing! Remember, practice makes perfect!
The first assessment screen is to be completed while interviewing your client. The first question asks for the number of accidental falls in the last 2 months. An accidental fall is defined as: “Unintentionally landing on the ground or any lower surface (such as a sofa) from something other than a violent blow or loss of consciousness”. The second question asks how many days per week your client peforms structured exercise. This includes going to the gym, physical therapist, or doing home exercise routines. It does not include other physical activities such as gardening or walking the dog. The third question asks whether the client walks with an assistive device such as a cane or a walker. Choose a response value that corresponds to the frequency of using the assistive device. Then click the NEXT button to proceed to the physical assessments.
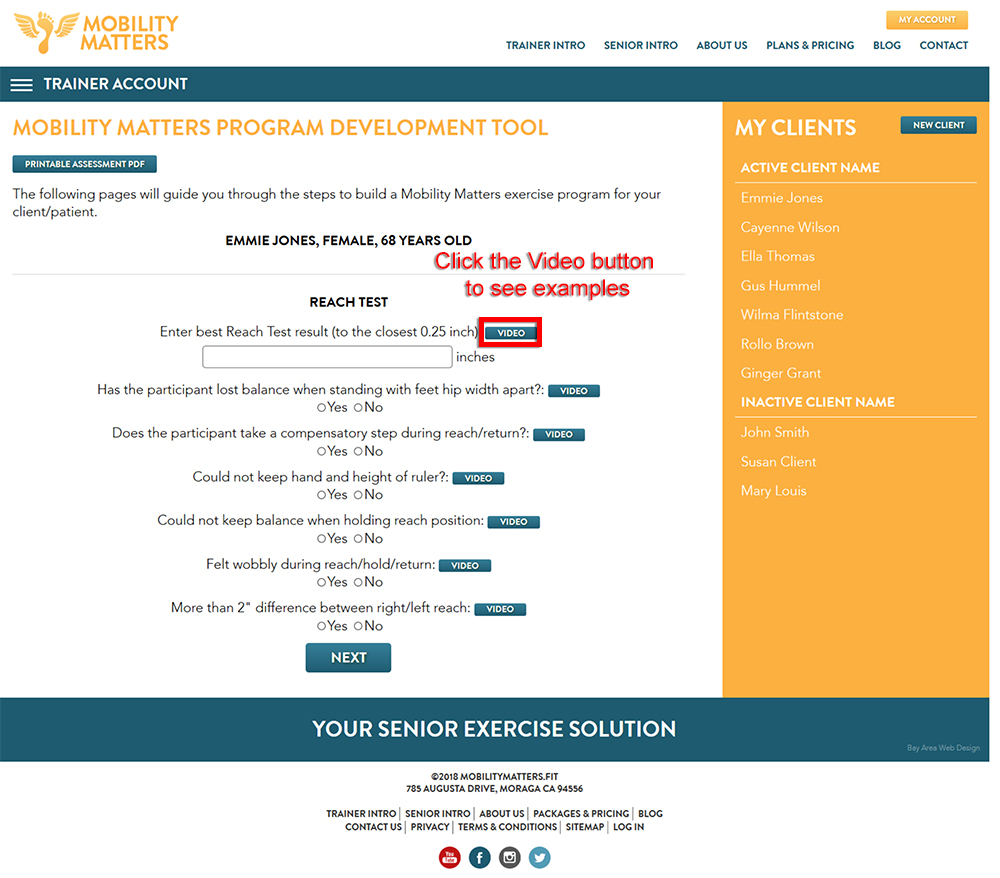
Reach Test
The first assessment is the Reach Test - a modified version of the Functional Reach Test used in the geriatrics field since 1991. The results of this assessment are used to construct the Joint Mobility and Static Balance exercises in your client’s program. This is because the Reach Test requires good flexibility throughout the kinetic chain and the ability to maintain balance in order to score well.
Equipment needed for the Reach Test includes:
- Standard yardstick (36” in length)
- Adhesive tape in order to affix the yardstick to a wall
- Straight edge (such as a standard ruler) for you to determine start & end points on the yardstick
- Good math skills (or a calculator!!!) to determine reach distance by subtracting the start point from the end point to the closest 0.25”
Here is the set-up for the Reach Test:
- Have your client stand next to a wall and affix the yardstick at mid-shoulder capsule height, make sure the yardstick is level
- Demonstrate the Reach Test to your client using the following procedures and have the client demonstrate at least once before taking measurements
Here is the procedure to deliver the Reach Test (you can watch a video of the Reach Test by clicking the button):
- Have your client stand next to a wall and affix the yardstick at mid-shoulder capsule height, make sure the yardstick is level
- Start by standing with the dominant side closest to the wall with the feet hip width apart, form a fist with the dominant hand, lift the straightened arm to the height of the yardstick, square up the shoulders to be aligned with the hips (many people “pre-reach” which is very common, opposite arm remains at side throughout the test
- Measure start point on the yardstick to closest 0.25” using the straight edge aligned at the end of the fist
- Reach straight forward as far as possible, allowing hips to hinge, knees to bend, torso to rotate and arm to stretch while keeping the fist at the height of the yardstick and the heels on the floor
- Once maximal reach has been reached, measure end point on the yardstick to closest 0.25” using the straight edge aligned at the end of the fist
- If the client reaches past the end of the yardstick, move him/her back so that both the start point and end point are along the yardstick
- Client returns to starting position, standing tall with both arms at the side
- Calculate the reach distance by subtracting the start point from the end point – BE SURE TO CONVERT TO A POSITIVE NUMBER!
- Perform 2 trials on dominant arm then have the client go to the other end of the yardstick and turn around and then perform 2 trials on non-dominant arm
- Enter the best score (the largest reach distance) into the data entry field on the web platform
Here are the criteria for a YES selection on the movement observations for the Reach Test (you can watch a video of each movement error by clicking the button next to each item):
1. If the client has difficulty standing at hip width or is visibly wobbling in the standing position. Additionally, you may ask the client if they feel wobbly when standing
2. If the client takes a step or shuffles the feet forward or backward to compensate for loss of balance at any point
3. If the client’s fist is unable to stay even with the height of the ruler at the end point of the reach – you may ask your client to lift the fist higher but you cannot provide any assistance
4. If the client has difficulty keeping balance at the furthest point of the reach. Additionally, you may ask the client if they feel wobbly at the end of the reach
5. If the movement in and out of the reach position is not smooth and controlled. Additionally, you may ask the client if they feel wobbly during the movement
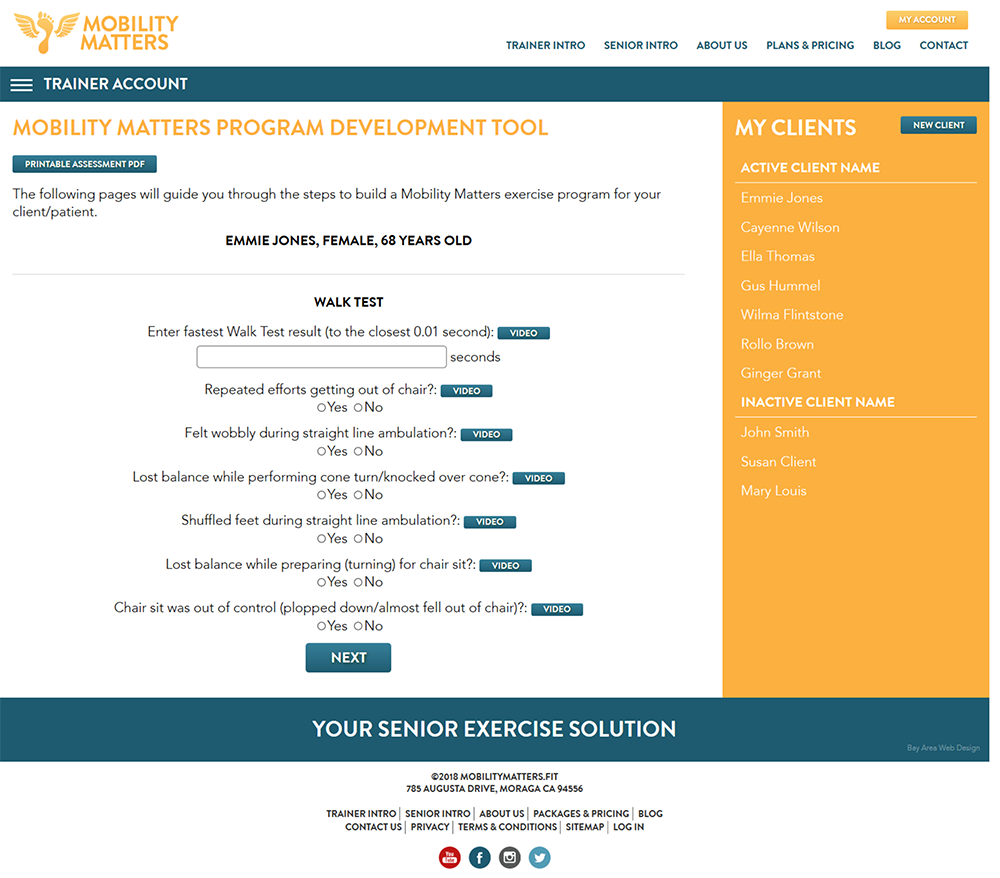
Walk Test
The second assessment is the Walk Test - a modified version of the Timed Up-and-Go Test used in the geriatrics field since 1990. The results of this assessment are used to construct the Dynamic Balance and Gait Enhancement exercises in your client’s program. This is because the Walk Test includes walking demands where straight line and rotational movement is required.
Equipment needed for the Walk Test includes:
- Standard folding chair or table chair without arms
- Measuring tape
- A 12-foot open area for walking
- Small cone or another item to designate turn-round point
- Adhesive tape to mark the starting (front of chair legs) and ending (back edge of cone) locations
- Stopwatch/timer that can measure to the closest 0.01 second
Here is the set-up for the Walk Test:
- Place the rear chair legs against a solid surface such as a bench or step so that the chair does not move upon standing or sitting
- Affix a piece of tape on the floor between the front chair legs & measure forward EXACTLY 3 meters (9 feet, 10 & 1/8 inches) and affix another piece of tape on the floor
- Place the BACK EDGE of the cone directly over the tape at the 3 meter mark
- Demonstrate the Walk Test to your client using the following procedures and have the client demonstrate at least once before taking measurements
Here is the procedure to deliver the Walk Test (you can watch a video of the Walk Test by clicking the button):
- Have your client sit slightly forward in the chair with hands on the lap and feet at hip width
- Instruct your client to “Walk as fast as possible without running, around the cone, then return to the chair and sit down”
- Say “Ready, Set, Go” to indicate start of the test and start the stopwatch on “Go”
- If your client moves before you say go, stop the trial and begin again
- Stop the stopwatch as soon as the rear end contacts the chair and note the time to the closest 0.01 second
- Client may choose what direction to walk around the cone
- Perform two trials and then have the client perform two more trials walking around the cone in the OPPOSITE DIRECTION – it is possible that there may be different movement strategies or issues when turning in the other direction
- Repeat the trial if the cone is kicked or knocked over
- Enter the fastest time (to the closest 0.01 second) into the data entry field on the web platform
Here are the criteria for a YES selection on the movement observations for the Walk Test (you can watch a video of each movement error by clicking the button next to each item):
1. If the client does not stand up from the chair on the first attempt on any repetition or requires significant rocking momentum prior to standing up
2. If the client veers off a straight line when walking to the cone or back to the chair. Additionally, you may ask the client if they feel wobbly while walking
3. If the client takes choppy or uneven steps while performing the cone turn or contacts the cone. Additionally, you may ask the client if they feel wobbly while turning
4. If the client shuffles feet or scuffs the floor on one or more steps during straight line walking
5. If the client takes choppy or uneven steps while turning around to prepare for the chair sit. Additionally, you may ask the client if they feel wobbly while turning
6. If the client loses eccentric control and forcefully plops down into the chair at the end of the test
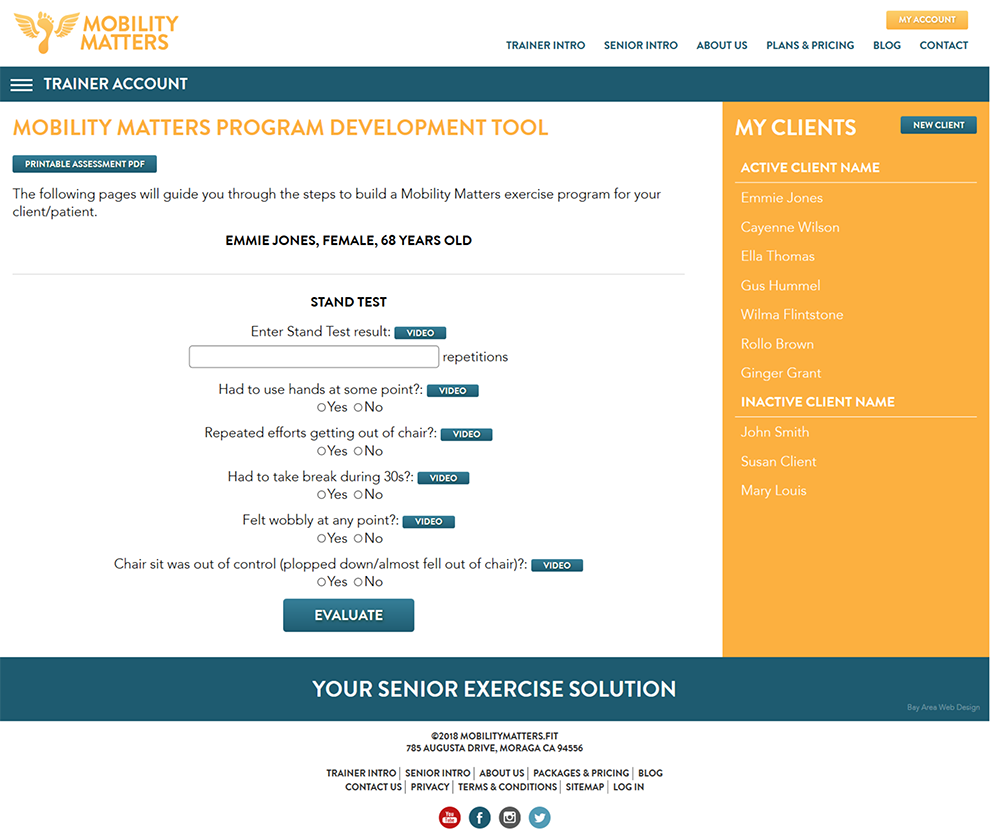
Stand Test
The third assessment is the Stand Test - a modified version of the 30-second Chair Stand Test used in the geriatrics field since 1999. The results of this assessment are used to construct the Muscle Strength/Power exercises in your client’s program. This is because the Stand Test requires multiple sit to stands over a 30-second time period.
Equipment needed for the Stand Test includes:
- Standard folding chair or table chair without arms
- Stopwatch that measures to the closest 0.01 second
Here is the set-up for the Stand Test:
- Place the rear chair legs against a solid surface such as a bench or step so that the chair does not move upon standing or sitting
- Demonstrate the Stand Test to your client using the following procedures and have the client demonstrate 2-3 repetitions before performing the test
Here is the procedure to deliver the Stand Test (you can watch a video of the Stand Test by clicking the button):
- Have your client sit slightly forward in the chair with hands crossed on the chest
- Instruct your client to “Perform as many sit to stands as possible for 30 seconds, be sure to fully stand up (no bend in the knee or hip) and to make contact with the chair with the rear end on every repetition”
- Say “Ready, Set, Go” to indicate start of the test and start the stopwatch on “Go”
- If your client does not fully stand up or does not contact the chair on the way back down, provide verbal feedback “All the Way Up” or “All the Way Down” and if correction is not made on next repetition, stop the trial and begin again
- Count the number of repetitions aloud during the 30 second period and provide occasional encouragement
- If your client takes a break during the 30 second period, be sure to remind to keep going as soon as able
- If arms come uncrossed or your client needs to use hands at any point, DO NOT count those repetitions, if client cannot perform any repetitions without using hands the score will be 0 repetitions
- If the client is fully standing at the 30-second mark, you may count that repetition
- Enter the total number of correctly completed repetitions into the data entry field on the web platform
Here are the criteria for a YES selection on the movement observations for the Stand Test (you can watch a video of each movement error by clicking the button next to each item):
1. If the client uses hands to push off the chair or the arms come uncrossed at any time
2. If the client takes multiple attempts to stand up from the chair or requires any rocking momentum to stand up on any repetition
3. If the client has to stop at some point during the 30 second period
4. If the client has difficulty keeping balance at any point during the test. Additionally, you may ask the client if they feel wobbly during the test
5. If the client loses eccentric control and forcefully plops down into the chair on any repetition